Delicious Orange Pound Cake

orange_poundcake

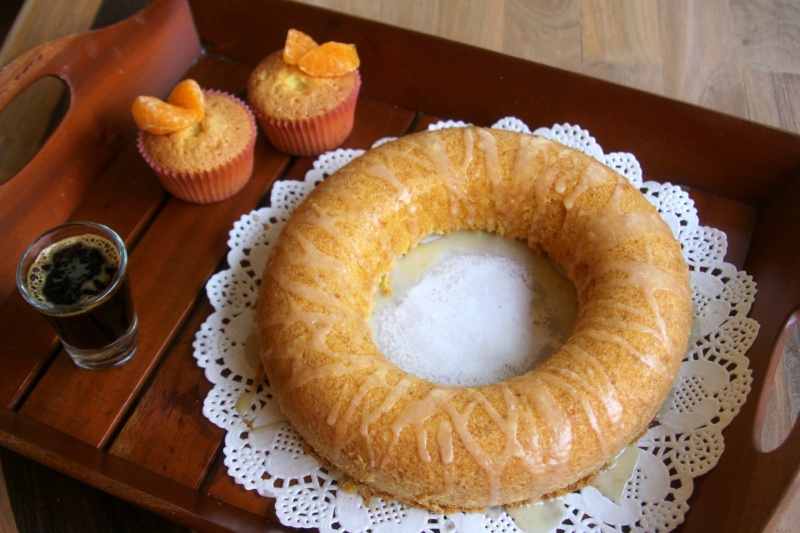
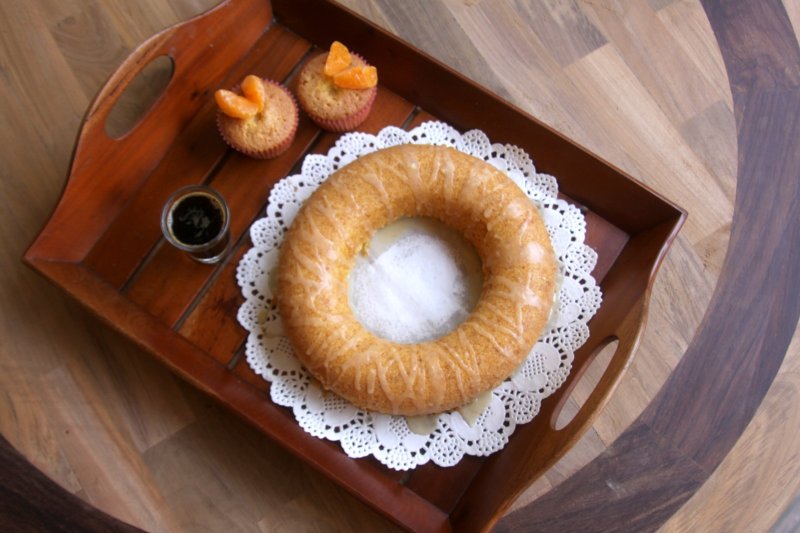
I moved out of my home, a place bit far but closer to my workplace, struggling to be an independent person. Living without kitchen access for an unceasing long 3 months is a nightmare. The first thing I wanted to do after coming home was to do some serious baking and have some mom-made food. Very relaxing indeed. Use some very fresh oranges, juice them out. Save the skin for rind. Bake it and enjoy it with some hot beverage or some drink 😉

Gather these:

  • Butter(room temperature attained)   – 100 grams
  • Granulated sugar                                       -250 grams (1 and 1/4 cups)
  • medium sized eggs                                    – 4
  • orange/vanilla extract                              – 1 teaspoon
  • Orange zest                                                  – 1 and 1/2 teaspoons
  • all purpose flour                                         -187.5 grams(1 and 1/2 cups)
  • baking powder                                             – 1/2 tablespoon
  • salt                                                                   -1/4 teaspoon
  • fresh orange juice                                       -6 tablespoons

For the orange glaze:

  • icing sugar                                                    – 12 tablespoons
  • orange juice                                                  -2 tablespoons
  • water                                                               – 1 tablespoon

Start with:

  • Preheat your oven to 350 F/180 C. Butter and flour the cake pan, tap the excess flour out.
  • In a clean dry bowl, beat butter till soft and fluffy, gradually add in sugar, scraping down bowl.
  • Sift flour, baking powder and salt. Add this step by step, alternating with orange juice into the butter mixture. When the mixture is creamy and thick, pour into the pan.
  • Bake for 30 mins. Lower down the temperature to 300 F/150 C. Bake again for around 30 mins, or until tooth pick inserted comes out clean.
  • Cool the cake on a wire rack, for around an hour. In the meantime, prepare the glaze, by whisking icing sugar and the liquids till the mixture is smooth and thin.
  • Once cooled, pour this over the cake, wait to dry.
  • Slice up and serve.

Enjoy the citric blast!

1-IMG_9554


Vodka Banana Loaf with caramelised fruits

1-fb

Adding another entry after a long break. Still wondering the reason for not updating the blog while cooking was still on in the kitchen. I baked this loaf for my brilliant friend, or sidekick or whatever is called these days, meeting after a year or so and she loved it. We have known each other for around 7 years and counting, someone who will pick up the phone at 3 am. Anyway, the creepy doodles on the image sounds Christmas and yes it was made in December.

I used vodka while mashing the ripe bananas, the flavour intensified a bit along with the obvious booze. As far as the topping is concerned, just add thinly sliced bananas and fruits of your choice on top, sprinkle it with castor sugar and bake them in the oven. The whole process of doing it separately in another pan and burning it is avoided.

Gather these:

  • All purpose flour     – 280 grams/ 2+1/3 cups
  • butter                         -110 grams
  • castor sugar              – 200 grams/ 1 cup approx
  • ground cinnamon    – 1 teaspoon
  • vanilla extract           – 1 teaspoon
  • eggs                             – 2 large
  • ripe bananas             – 4-5 medium
  • milk                            – 50 ml(3 tablespoon+1 teaspoon)
  • vodka                         – 125 ml (1/2 cup)
  • baking soda              – 1 teaspoon
  • salt                             – 1/4th teaspoon
  • thinly sliced bananas, cranberries etc – a handful along with castor sugar to sprinkle.

Start with:

  • Preheat your oven to 170 degrees
  • Peel the bananas and mash them along with vodka, use your hands for a better texture.
  • In a clean dry bowl, sieve flour, ground cinnamon, salt and baking soda.
  • Take another bowl, cream butter and sugar well. Add the vanilla, eggs one by one and beat it till creamy and thick.
  • Add the mashed banana and milk, mix it well. Fold in the flour and combine well to form a thick mixture.
  • Line your baking tin with parchment and add the mix and even it at the top. Add the fruit slices on top and generously sprinkle castor sugar all over it, covering the fruits.
  • Bake for around an hour, check in between to confirm if done or not.
  • Once baked, the top will be having a crusty texture with caramelised fruits on it. Cool the loaf and serve with some whipped cream or with vodka 😀

1-fb

Easy Wheat Brownies

fbb


I always mess up while cutting the cake into perfect bar pieces, so I made one in a small mould and here it is! The name itself is self explanatory, except the point that there is no baking powder or baking soda in the recipe. Grab yourself some ice cream, a good batch of brownies and enjoy. Since I ran out of flour, I replaced it with wheat flour, which luckily turned out normal and taste similar to all purpose flour and hence the name.

Gather these:

  • Flour      – 3/4th cup
  • eggs       – 3 medium sized
  • vanilla extract – 1 1/2 teaspoon
  • Dutch processed cocoa powder  – 1/4th cup+1 tablespoon
  • melted butter – 1/2 cup/110 grams approx
  • granulated sugar – 3/4th cup+ 2 tablespoon
  • salt        – 1/4th teaspoon
  • chopped walnuts – your choice

Start with:

  • Preheat your oven to 160 degrees
  • In a clean bowl, mix eggs, vanilla, sugar, cocoa and salt. Try not to get lumps, as I started with a wooden spoon and got good amount of lumps, then I used wire whisk to get rid of them.
  • Add flour 2 tablespoons at a time and mix well, repeating until 3/4th cup is mixed well
  • Finally, mix in the melted butter and chopped nuts, if you are adding them.
  • Line your baking tray with parchment and pour the thick batter, bake them for about 20-30 minutes.
  • Once cooled, cut them to beautiful squares, since I failed at that, I baked in individual cups and won. Serve with your icecream, what I used here is creme brulee icecream, storebrought.


Indian/Australian Tea Cake

fb

I am that kind of person who hates to simply sip up some plain hot beverage without something to chew or bite on, well it is kind of incomplete for me. The first impression of tea cake is like a bun smeared with a layer of jam or butter,the real English style. But when it comes to Australia and India, we like it how the name sounds..Cake, a spongy dense and flavored cake, even it’s awesome with a hot coffee or water. It is quite easy to whip up with the readily available stuffs from your own pantry, or you can say, making this is like a piece of cake. Apart from the poor lighting and photography, it tastes good. The lighting was so dumb and dull, I had to add some extra contrast by throwing some candied cherries which was left in the kitchen for no good reason. So bake this cake and enjoy it with your evening coffee/tea and do make sure it is served WARM! And there is some powdered cinnamon and granulated sugar showered on top, making it pretty and adding the flavor.

Gather these:

  • butter, unsalted    – 100 grams
  • granulated sugar -3/4 cup
  • large eggs      -2
  • vanilla extract – 1 teaspoon
  • self raising flour-1 and 1/2 cup
  • milk                  -1/2 a cup (approx 125 ml)

For brushing the cake and dusting cinnamon,

  • butter – 1 tablespoon
  • cinnamon powder and granulated sugar

Start with:

  • Preheat your oven to 165 degrees and set your pan ready with baking parchment or grease with butter and dust it with flour.
  • In a clean dry bowl, beat butter and sugar until creamy. Add eggs and vanilla essence, beat until the mixture turns fluffy,
  • Alternately add milk and flour and fold in well. This might take around 2 minutes and make sure the whole mixture is smooth and uniform.
  • Spoon the thick batter onto your cake tin halfway and bake them for 35 to 45 minutes, until the toothpick inserted comes out clean.
  • When the cake is warm (set it to cool for sometime), brush some butter over it and sift the cinnamon and granulated sugar mixture over the cake.

Slice them nicely into wedges and enjoy with your favorite beverage!!


fb

Tembleque

1-t2

This, a wobbly, damn coconutty dessert, spawned in Puerto Rico is more than enough to conclude a meal. This sweet deal also called ‘manjar branco’ is pretty much notorious in Brazil. Add on-s with the fresh coconut milk is vanilla in my recipe, but nutmeg and cinnamon like flavored spices can also be used in here. Tembleque is all about flavor, not it’s sugariness because the fundamental part is coconut milk, which is like a flavor bomb, along with its aroma. So if you get this dessert made by someone else, all you have to do is relax on a chair, close your eyes, have a spoon of it and get yourself lost into the gusto of coconut milk, cinnamon, nutmegs or vanilla or whatever is in there. The recipe is quite simple with a fine outcome. One notable difference is the use of corn flour as a thickening agent instead of the cliché gelatin or china grass used in other puddings. You can even give a topping with chocolate shavings or some fruit coulis freshly made to get diverted from the usual. So,fall in love with this Puerto Rican babe!

Gather these:

  • Coconut milk       – 1 1/2 cups thick milk or 1 can(13.5 oz approx.)
  • Corn starch          -1/4 cup (if using corn flour, take 1/4th cup, mix it with some water until no lumps are formed)
  • granulated sugar -1/4 cup+2 tablespoon
  • salt                       – a dash (1/8th teaspoon)
  • vanilla extract      – 1 teaspoon
  • cinnamon powder+cocoa powder – 1 tablespoon each, sifted together

Start with:

  • Heat up a heavy sauce pan, add coconut milk and cornstarch, along with granulated sugar, vanilla extract and salt. Stir constantly over a medium-high flame, check not to stick to the bottom, around 4-5 minutes.The consistency must be similar to that of yoghurt, smooth but thick.
  • Pour the mixture to the desired clean pudding bowls, keep them in the fridge for around 3-4 hours, until its set.
  • This can be served unmolded or molded, your choice. If you want to unmold them, carefully run a knife through the bowl edges and invert them to the serving plate.
  • Finish the produce by adding sifted cocoa and cinnamon powder on top! I added dried strawberry to get a contrast.

1-t7

MOIST HEAVY CHOCOLATE COFFEE CAKE

b1


Found some oil and fetched some fresh yogurt from the store, and overloaded them with chocolate and bam! you get a moist and dainty cake in 45 minutes. This ain’t super sweet and hence I dusted them with icing sugar. Normally cakes are displayed with some icing or a fruit on top. Since I was lazy to make either, I finished it off with a tiny spoon of strawberry jam/preserve. Grab your stuffs, gear up the tools and bake it up. 😀

Gather these:

  • all purpose flour   – 1 cup
  • baking powder    – 1/2 teaspoon
  • baking soda     – 1 teaspoon
  • non-flavored oil – 1/2 cup
  • granulated sugar-3/4 cup
  • dutch processed cocoa powder -1/2 to 3/4 cup
  • warm full fat milk -1/4 cup
  • yogurt beaten  – 1/4 cup
  • 2-3 teaspoons of coffee in 1/2 a cup boiling water
  • vanilla – 1 to 1.5 teaspoons

Start with:

  • Preheat your oven to 175 degrees.
  • Sieve your dry ingredients together into a bowl.
  • Add the oil,milk,yogurt and vanilla. Beat them for around 1 to 2 minutes.
  • Pour the coffee into the batter and incorporate thoroughly and beat them well for 3 minutes.
  • Grease your pan and dust it with some flour or line with parchment. Pour the batter until half it’s volume.
  • Bake for around 35 to 40 minutes until the toothpick inserted to the center comes out clean.
  • Cool the cake for around an hour and separate it from the pan. Dust it with some icing sugar and top with your favorite fruit or jam. Indulge!

5

Purin

1-fb

I am pretty sure that this name is gonna ring a bell from chemistry, an organic compound. Well, its actually Japanese name for pudding(creme-caramel to be precise). It is akin to a typical Mexican flan, but purin is more condensed. Some people prefer to use gelatin, like I did, so it will have a tad bit of jelly structure, which makes it actually better. Just like a normal creme caramel, its topped with caramel, which can be light or dark, a personal choice, I have used the dark one here, which has the bitter zing of burnt sugar, which is some i felt exquisite for a sweet tooth. Two ways of fashioning this dessert is either by baking or simply putting them straight away to fridge. I have chosen the second one, which turned out well. With only a few ingredients, check out how to carve this beauty!

Gather these:

For the caramel:

  • granulated sugar   – 175 grams
  • water        – 3 tablespoons

For the pudding:

  • non flavored gelatin   – 10 grams
  • water     – approx 1/4 cup
  • egg yolks   – 4 large
  • granulated sugar  – 1/4th cup + 2 tablespoons
  • full fat milk   – 400 ml/1 and 3/4 cups
  • whipping cream  – 1/2 a cup
  • vanilla   – 2 teaspoons

Start with:

  • Combine gelatin with water for it to bloom and leave it aside. Arrange your ramekins.
  • Begin with the caramel by melting the granulated sugar in a heavy bottomed vessel, over a medium to high flame. Watch it turn deep brown.
  • Once no granules are left on the pan, add 3 table spoons of water. Be careful about the mess the hot pan is about to make. Use a wooden spoon to mix them thoroughly.
  • Move them from the flame and fill 2/3rd of the ramekins with the caramel. Dip the bottom of ramekin in hot water so that it wont get hardened.  Now, moving up for the pudding.
  • In a clean dry bowl, using a wire whisk, cream egg yolks and sugar along with vanilla and set it aside.
  • In a sauce pan, heat up half of the milk (200 mils) until warm. Do not let it boil.
  • Add the milk in batches of four into the creamed egg mixture, whisking them thoroughly.
  • Now pour this mixture back to the pain and place them in a low flame, stirring continously until bubbles are formed at the edges. Add the gelatin and remove from heat. Now pour them through a sieve to get a smooth mixture into a bowl.
  • Place this bowl in an ice bath. Add the remaining milk and whipping cream and whisk them altogether.
  • Pour the thick mixture into individual ramekins(taken from the hot water). Fridge them up for 1 and half hour or until wobbly.
  • Once set, its time to turn them out to a plate. Take a bowl of hot water.
  • Run a knife through the ramekin edge to release the pudding. Now to release the caramel bottom, dip only the bottom part of the ramekin in the hotwater for approximately 7 seconds.
  • Now tilt the ramekin upside down to the serving plate and voila, its out! Indulge into the calories 😛

1-IMG_4775 blog


CHOCOLATE GENOESE SPONGE WITH CHOCOLATE SAUCE

fb1The name itself is self-explanatory that this cake originated from Genoa, capital city of Liguria and one of the bulkiest cities in North western Italy. The noted difference between Genoese cake and regular sponge cake is the method in which eggs are beaten, wholly in the former and separately in the latter. This has become one of the basic lessons in French Patisserie, which can be served with fillings or covered in jam cream or any sorts of fruit puree, or even frosted which is personal choice, since it’s a bit dry and elastic compared to others. Ladyfingers made from these can also be used in tiramisu, classic italian dessert! One more important thing to be noted is that there is NO leavening agents used in this recipe, just whisks eggs and sugar in a bain marie or a double boiler to a ribbon consistency and then combine with flour and melted butter. This recipe is adapted from Larousse Gastronomique, my cooking bible! I am jotting down the recipe here for the chocolate version of this cake and for non flavored recipe, omit the cocoa, and proceed with the same steps.

Gather these:

  • unsalted butter   – 65 grams/2 tablespoons
  • caster sugar         -75 grams/6 tablespoons
  • unsweetened cocoa powder- 75 grams/6 tablespoons
  • eggs                       – 4
  • all purpose flour – 125 grams/1 cup

For the chocolate sauce:

  • roughly chopped chocolate – 250 grams
  • milk  – 75 ml
  • unsalted butter -20 grams
  • caster sugar  – 60 grams
  • double cream  – 1.5 tablespoon


Start with:

  • Preheat your oven to 180 degrees/350 F.
  • Melt the butter in a bain marie or a double boiler and use a little bit of it to butter your cake mould.
  • In a heatproof bowl, mix sugar and cocoa powder and 4 eggs. Place them in a bain marie or double boiler and whisk the mixture until they are thick and increased in volume and remove it only when a ribbon like consistency is attained.
  • Now, fold in the flour and melted butter into the cocoa mixture. When beautifully incorporated, transfer then into your cake mould.
  • Bake them for around 25 to 30 minutes.
  • If you find your cake to be too dry, brush some caramel sauce over it, like I did.

1-IMG_4717

  • For the chocolate sauce, melt the chopped chocolate in a double boiler with milk and butter.
  • When it turns to a smooth consistency, add caster sugar and double cream.
  • When smooth, remove them from heat.
  • Keep it aside for about 15 minutes and them pour them over the cake. Decorate them using walnuts, cherries and some chocolate chips. Voila! Emerge into the world of chocolate!

fb1

Espresso Cocoa Panna Cotta

p2IMG_4494pix

Well, this Italian egg-less treat is traditionally served with fruits or some sort of liquid sauce like a coulis or caramel, but here I am, serving it with nothing because of the heavy chocolate flavor along with a tinge of coffee, which is pretty mouthful. Some interesting fact about Panna Cotta is that, at the time when there was no gelatin readily available in hand, people boiled fish bones to obtain the collagen that later gets converted to gelatin! The whole point is that this recipe is really simple now and easy to make,best if cooled overnight. Some thing similar to this is ‘mousse’, which is whipped and much more lighter than panna cotta. But, who doesn’t like Italian! Try it out!

Gather these:

  • gelatine       – 3 teaspoons
  • warm water – 80 ml or approximately 1/3rd a cup
  • fresh cream(single pouring) – 400 ml
  • granulated sugar – 1 cup
  • dutch processed cocoa powder -100 grams
  • espresso powder  – 1.5 teaspoon
  • vanilla essence      – 1 teaspoon
  • full fat milk            – 250 ml/ 1 cup

Start with:

  • Take warm water in a bowl and sprinkle the gelatin for it to bloom. This will take about 6-7 minutes. Set aside.
  • In a heavy bottomed sauce pan, heat fresh cream and vanilla over medium heat. Add 1 tablespoon cocoa at an instance, stir frequently to combine. Repeat this for espresso and cocoa powder. Do not burn the mixture.
  • After addition of cocoa and espresso, add the bloomed gelatin and stir well to get a uniform smooth mixture with a beautiful texture.
  • If there are some lumps in the mixture, strain them once. Finish it by adding milk to it. Stir it well to combine. Taste them and adjust the sugar and cocoa.
  • Transfer them to ramekins or bowls and leave them in the fridge for 2-3 hours. I used a silicone pie dish to set and used a cookie cutter to make those shapes.
  • Demould them by inverting the bowl and giving it a light shake. Serve it as it is or with some berries of your choice!

p1

Enjoy!!

Vanilla Latte Cupcakes with Chocolate Fudge icing

blog2Well, this is another something from my bake-sale! This one here is plush in coffee, with the special rum syrup that’s soaked in! Though latte means milk coffee, i used buttermilk instead and it is good!! Chocolate fudge icing also gives it another burst of chocolate flavor, which is excellent to go with coffee. Coffee is always ON with irish whiskey, so here I gave a try with rum and yes it is good!! Though the recipe is simple, the end product is a prodigious treat!Take a look!

Gather these:

  1. FOR THE CUPCAKES
  • unsalted butter    – 1 and half stick/ 3/4th a cup at room temparature
  • granulated sugar  – 1 and half cup
  • eggs      – 3 large
  • all purpose flour   – 2 cups
  • baking powder  – 1 teaspoon
  • salt  – 1/4 teaspoon
  • espresso powder or any good brand coffee powder (I used Davidoff)- 1 tablespoon
  • strong brewed coffee – 1/2 a cup
  • fresh buttermilk – 1/4th cup + 2 tablespoon

2. FOR THE COFFEE-RUM SYRUP

  • strong brewed coffee – 1 cup
  • white rum   – 1/4 cup
  • drinking chocolate(optional) – 2 teaspoon
  • sugar  – 1 to 2 tablespoon

3. FOR THE CHOCOLATE FUDGE ICING

  • granulated sugar   – 1 cup
  • cocoa powder  – 2 heaped tablespoons
  • unsalted butter – 1/4 cup
  • milk  – 1/3 cup
  • vanilla essence – 1 teaspoon

Okay, the list seems long, but its worth it!

Start with:1. CUPCAKES

  • Preheat your oven to 160 degrees. Get set your muffin liners in your tray.
  • Sieve your flour, espresso powder, baking powder and salt 3 times and set aside.
  • Mix coffee and butter milk in another bowl.
  • In a clean bowl, combine butter and sugar until fluffy almost about 3 minutes.
  • Add the eggs one by one, mixing well after each addition.
  • Now alternatingly add the flour mix and the coffee-buttermilk, incorporating them well, with patience until you get a smooth light mixture.
  • Fill your cupcake liners with this batter, about 3/4th the volume of each.
  • Bake it for about 30 minutes, or the toothpick/tester inserted comes out clean. While it’s in the oven, make the coffee rum syrup.
  • Transfer them to a wire rack.

2. COFFEE-RUM SYRUP

  • Mix the ingredients together and adjust the sugar and coffee accordingly.
  • When done, add 1-2 tablespoons of syrup to each cupcakes uniformly. Either the cakes should be warm, or the syrup should be warm, so that the osmos of the syrup into the cake gets fast. Do not completely soak the cake, it kills it.

3. CHOCOLATE FUDGE ICING

  • In  a pan, mix sugar, cocoa powder and milk under medium heat, until large bubbles are seen, boil for 1 minute.
  • Take them off the heat, add butter and vanilla essence. Return them to medium heat and heat them until it thickens.
  • You can also replace sugar with icing sugar, then omit the heating step after adding butter.
  • Use them immediately on the cake.

So, bake the cake, pour the coffee rum syrup and finally, chocolate fudge icing. I just finished them by decorating with silver edibles and it looked all cinderella-ish,all pretty and cute!

cinderella